
2、理解需要使用回环口为目的。
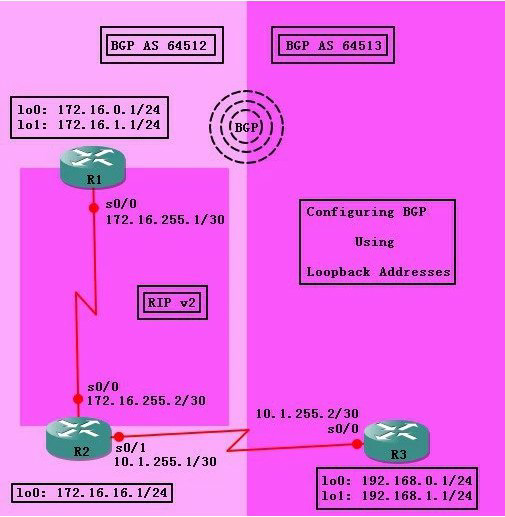
配置好各路由器IP地址,测试互连可达。
配置AS 64512的RIPv2路由协议。
首先在R1和R2上使用回环口创建邻居关系:
R1(config)#router bgp 64512
R1(config-router)#neighbor 172.16.16.1 remote-as 64512 ---->创建对等体,使用R2回环口的地址
R1(config-router)#network 172.16.0.0 mask 255.255.255.0
R1(config-router)#network 172.16.1.0 mask 255.255.255.0
R1(config-router)#network 172.16.255.0 mask 255.255.255.252
R1(config-router)#exit
R2(config)#router bgp 64512
R2(config-router)#neighbor 172.16.0.1 remote-as 64512 ---->创建对等体,使用R1回环口的地址
R2(config-router)#network 172.16.255.0 mask 255.255.255.252
R2(config-router)#network 172.16.16.0 mask 255.255.255.0
R2(config-router)#network 10.1.255.0 mask 255.255.255.252
R2(config-router)#exit
查看R1和R2的BGP summary 信息:
R1#show ip bgp summary
………………
Neighbor V AS MsgRcvd MsgSent TblVer InQ OutQ Up/Down State/PfxRcd
172.16.16.1 4 64512 0 0 0 0 0 never Active
---->Active状态指出BGP正在尝试创建邻居关系
R2#show ip bgp summary
……………………
Neighbor V AS MsgRcvd MsgSent TblVer InQ OutQ Up/Down State/PfxRcd
172.16.0.1 4 64512 0 0 0 0 0 never Active
在R1上打开debug:
R1#debug ip bgp i ---->对接收到的BGP数据包分析
BGP debugging is on for address family: IPv4 Unicast
*Mar 1 00:35:33.967: BGP: 172.16.16.1 open active, local address 172.16.255.1
*Mar 1 00:35:34.007: BGP: 172.16.16.1 open failed: Connection refused by remote host, open active delayed 29486ms (35000ms max, 28% jitter)
被远程主机拒绝~~这个好像这里说的跟真实的原因不一样~~书上说是因为没有路由可达对方回环口,并且书上给出的信息也和这里的不一样,这里和书里一样配置了相同的RIP,是可达的,如下测试:
R2#ping 172.16.0.1 so 172.16.16.1
Type escape sequence to abort.
Sending 5, 100-byte ICMP Echos to 172.16.0.1, timeout is 2 seconds:
Packet sent with a source address of 172.16.16.1
!!!!!
Success rate is 100 percent (5/5), round-trip min/avg/max = 24/32/48 ms
不能创建邻居的原因有可能是需要指定使用回环口做邻居。
所以这里可能是书里的解释有错,也可能是我某一步做得跟书里的不一样,不管如何,且往下看。
在BGP协议中指出使用回环口配置邻居关系:
R1(config)#router bgp 64512
R1(config-router)#neighbor 172.16.16.1 update-source lo 0 ---->指定使用本地回环口创建邻居关系
R1(config-router)#exit
R2(config)#router bgp 64512
R2(config-router)#neighbor 172.16.0.1 update-source lo 0
R2(config-router)#exit
在R2配置完后清一下进程立即提示邻居关系已经创建:
R2#clear ip bgp *
R2#
*Mar 1 00:49:43.255: %BGP-5-ADJCHANGE: neighbor 172.16.0.1 Down User reset
R2#
*Mar 1 00:49:45.291: %BGP-5-ADJCHANGE: neighbor 172.16.0.1 Up
再次查看BGP summary信息:
R1#show ip bgp summary
………………
Neighbor V AS MsgRcvd MsgSent TblVer InQ OutQ Up/Down State/PfxRcd
172.16.16.1 4 64512 10 10 13 0 0 00:00:41 2
R2#show ip bgp summary
………………
Neighbor V AS MsgRcvd MsgSent TblVer InQ OutQ Up/Down State/PfxRcd
172.16.0.1 4 64512 15 15 7 0 0 00:05:03 2
---->成功创建对等体信息
再次配置R2和R3使用回环口创建eBGP的邻居关系:
R2(config)#router bgp 64512
R2(config-router)#neighbor 192.168.0.1 remote-as 64513
R2(config-router)#neighbor 192.168.0.1 update-source lo 0 ---->指定使用回环口创建邻居关系
R2(config-router)#neighbor 192.168.0.1 ebgp-multihop 2 ---->指出eBGP的邻居地址存在多跳特性(详看下文)
R2(config-router)#exit
R2(config)#ip route 192.168.0.1 255.255.255.255 10.1.255.2
---->由于R2和R3处于不同的自治系统,所以经建立一条路由使其可达,下文会提到这个
R3(config)#router bgp 64513
R3(config-router)#neighbor 172.16.16.1 remote-as 64512 ----->不解释,参考上文
R3(config-router)#neighbor 172.16.16.1 update-source lo 0 ----->不解释,参考上文
R3(config-router)#neighbor 172.16.16.1 ebgp-multihop 2 ----->不解释,参考上文
R3(config-router)#
R3(config-router)#network 192.168.0.0
R3(config-router)#network 192.168.1.0
R3(config-router)#network 10.1.255.0 mask 255.255.255.252
R3(config-router)#exit
R3(config)#ip route 172.16.16.1 255.255.255.255 10.1.255.1 ----->静态路由,必须的
R3(config)#end
在R2查看邻居关系:
R2#show ip bgp summary
………………
Neighbor V AS MsgRcvd MsgSent TblVer InQ OutQ Up/Down State/PfxRcd
172.16.0.1 4 64512 30 31 9 0 0 00:20:25 2
192.168.0.1 4 64513 7 8 9 0 0 00:02:26 3
---->成功创建
* - * - * - * - * - * - * - * - * - * - * - * - * - * - * - * - * - * - * - * - * - * - * - * - * - * - * -
* - * - * - * - * - * - * - * - * - * - 我是分隔线 - * - * - * - * - * - * - * - * - * - * -
* - * - * - * - * - * - * - * - * - * - 我是分隔线 - * - * - * - * - * - * - * - * - * - * -
* - * - * - * - * - * - * - * - * - * - 我是分隔线 - * - * - * - * - * - * - * - * - * - * -
* - * - * - * - * - * - * - * - * - * - * - * - * - * - * - * - * - * - * - * - * - * - * - * - * - * - * -
假如一开始在64512中就没有用RIP协议来帮助路由,则应该是下面的情况。
在R1上的调试输出:
R1#debug ip bgp in ---->查看收到的数据
BGP debugging is on for address family: IPv4 Unicast
R1#
*Mar 1 01:18:33.923: BGP: 172.16.16.1 connection timed out 180372ms (last update) 180000ms (hold time)
*Mar 1 01:18:33.923: BGP: 172.16.16.1 went from Established to Closing
*Mar 1 01:18:33.923: %BGP-5-ADJCHANGE: neighbor 172.16.16.1 Down BGP Notification sent
R1#
*Mar 1 01:18:33.923: %BGP-3-NOTIFICATION: sent to neighbor 172.16.16.1 4/0 (hold time expired) 0 bytes
*Mar 1 01:18:34.927: BGP: 172.16.16.1 local error close after sending NOTIFICATION
*Mar 1 01:18:34.927: BGPNSF state: 172.16.16.1 went from nsf_not_active to nsf_not_active
*Mar 1 01:18:34.931: BGP: 172.16.16.1 went from Closing to Idle
*Mar 1 01:18:34.931: BGP: 172.16.16.1 closing
R1#
*Mar 1 01:18:35.947: BGP: 172.16.16.1 went from Idle to Active
*Mar 1 01:18:35.955: BGP: 172.16.16.1 open active delayed 25231ms (35000ms max, 28% jitter)
R1#
*Mar 1 01:19:01.187: BGP: 172.16.16.1 active open failed - no route to peer, open active delayed 25948ms (35000ms max, 28% jitter)
R1#
*Mar 1 01:19:27.135: BGP: 172.16.16.1 active open failed - no route to peer, open active delayed 33448ms (35000ms max, 28% jitter)
红字信息表明没有路由可达,此时BGP已经发现使用对方回环口创建邻居关系,BGP称其为多跳,而邻居创建不成功的主要原因是no route to peer,即没有路由可以到达邻居的回环口,无法进行TCP的三次握手。
在R1和R2启用RIP并正确配置后,邻居关系立即成功建立,所以可能书中有点出错,不过这个很可能是所用的设备不同的原因。


