1、掌握NBMA 网络中OSPF 的邻居关系手工和自动建立的两种配置方法。
2、掌握指定OSPF 的接口优先级和通过修改OSPF 的默认接口网络类型避免DR的选举出错。
2、掌握指定OSPF 的接口优先级和通过修改OSPF 的默认接口网络类型避免DR的选举出错。
上图:
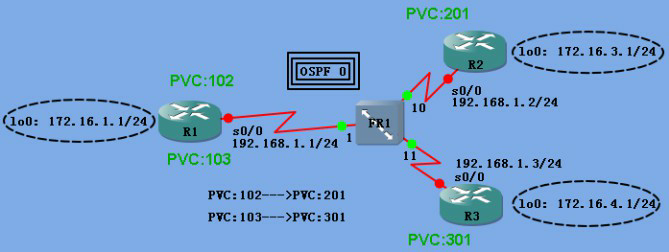
配置好基本信息,配置好帧中继,测试互连地址连通:
在R1上:
R1(config)#int lo0
R1(config-if)#ip add 172.16.1.1 255.255.255.0
R1(config-if)#ip ospf network point-to-point (避免其环回地址被OSPF学习为/32的主机地址)
R1(config-if)#exit
R1(config)#int s0/0
R1(config-if)#ip add 192.168.1.1 255.255.255.0
R1(config-if)#no sh
R1(config-if)#encapsulation frame-relay
R1(config-if)#no frame-relay inverse-arp
R1(config-if)#frame-relay map ip 192.168.1.2 102 broadcast
R1(config-if)#ip add 192.168.1.1 255.255.255.0
R1(config-if)#no sh
R1(config-if)#encapsulation frame-relay
R1(config-if)#no frame-relay inverse-arp
R1(config-if)#frame-relay map ip 192.168.1.2 102 broadcast
R1(config-if)#frame-relay map ip 192.168.1.3 103 broadcast
R1(config-if)#exit
R1(config-router)#router ospf 1
R1(config-router)#network 172.16.1.0 0.0.0.255 a 0
R1(config-router)#network 192.168.1.0 0.0.0.255 a 0
R1(config-router)#exit
R1(config-router)#network 172.16.1.0 0.0.0.255 a 0
R1(config-router)#network 192.168.1.0 0.0.0.255 a 0
R1(config-router)#exit
采用手工映射配置,主要目的是配置星开的帧中继拓扑网络,并且在时,采用BROADCAST关键字,以便帧中继可以支持广播的转发。
在R2上:
R2#conf t
R2(config)#int lo0
R2(config-if)#ip add 172.16.3.1 255.255.255.0
R2(config-if)#ip ospf network point-to-point
R2(config-if)#exit
R2(config)#int lo0
R2(config-if)#ip add 172.16.3.1 255.255.255.0
R2(config-if)#ip ospf network point-to-point
R2(config-if)#exit
R2(config)#int s0/0
R2(config-if)# ip address 192.168.1.2 255.255.255.0
R2(config-if)# encapsulation frame-relay
R2(config-if)# frame-relay map ip 192.168.1.1 201 broadcast
R2(config-if)# encapsulation frame-relay
R2(config-if)# frame-relay map ip 192.168.1.1 201 broadcast
R2(config-if)# frame-relay map ip 192.168.1.3 201 broadcast
R2(config-if)# no frame-relay inverse-arp
R2(config-if)#no sh
R2(config-if)#no sh
R2(config-if)#exit
R2(config)#router ospf 1
R2(config-router)#network 192.168.1.0 0.0.0.255 a 0
R2(config-router)#network 172.16.3.0 0.0.0.255 a 0
R2(config-router)#exit
R2(config-router)#network 192.168.1.0 0.0.0.255 a 0
R2(config-router)#network 172.16.3.0 0.0.0.255 a 0
R2(config-router)#exit
在R3上:
R3#conf t
R3(config)#int lo0
R3(config-if)#ip add 172.16.4.1 255.255.255.0
R3(config-if)#ip ospf network point-to-point
R3(config-if)#exit
R3(config)#int lo0
R3(config-if)#ip add 172.16.4.1 255.255.255.0
R3(config-if)#ip ospf network point-to-point
R3(config-if)#exit
R3(config)#int s0/0
R3(config-if)#ip add 192.168.1.3 255.255.255.0
R3(config-if)#en fr
R3(config-if)#no fr inver
R3(config-if)#fr map ip 192.168.1.1 301 broadcast
R3(config-if)#ip add 192.168.1.3 255.255.255.0
R3(config-if)#en fr
R3(config-if)#no fr inver
R3(config-if)#fr map ip 192.168.1.1 301 broadcast
R3(config-if)#fr map ip 192.168.1.2 301 broadcast(相当于加一条路由)
R3(config-if)#no sh
R3(config-if)#exit
R3(config)#router ospf 1
R3(config-router)#network 172.16.4.0 0.0.0.255 a 0
R3(config-router)#network 192.168.1.0 0.0.0.255 a 0
R3(config-router)#exit
R3(config-if)#no sh
R3(config-if)#exit
R3(config)#router ospf 1
R3(config-router)#network 172.16.4.0 0.0.0.255 a 0
R3(config-router)#network 192.168.1.0 0.0.0.255 a 0
R3(config-router)#exit
以上配置完成后,查看任一路由器邻居表,结果显示为空,说明OSPF的邻居关系没有被建立:
R1#show ip ospf nei
R1#
再查看其串口信息:
R1#show ip ospf int s0/0
Serial0/0 is up, line protocol is up
Internet Address 192.168.1.1/24, Area 0
Process ID 1, Router ID 172.16.1.1, Network Type NON_BROADCAST, Cost: 64
Transmit Delay is 1 sec, State DR, Priority 1
Designated Router (ID) 172.16.1.1, Interface address 192.168.1.1
No backup designated router on this network
Timer intervals configured, Hello 30, Dead 120, Wait 120, Retransmit 5
oob-resync timeout 120
Hello due in 00:00:07
Supports Link-local Signaling (LLS)
Index 2/2, flood queue length 0
Next 0x0(0)/0x0(0)
Last flood scan length is 0, maximum is 0
Last flood scan time is 0 msec, maximum is 0 msec
Neighbor Count is 0, Adjacent neighbor count is 0
Suppress hello for 0 neighbor(s)
OSPF把帧中继接口默认看成非广播网络,而不受配置映射时是否使用BROADCAST的参数影响。
影响OSPF 协议不能自己形成邻居关系的主要原因是,OSPF主观认为NBMA的网络不支持广播和组播,因此不会主动的向外发送OSPF的HELLO 数据包。
可以手动指定邻居解决此问题:
R1(config)#router ospf 1
R1(config-router)#neighbor 192.168.1.2
R1(config-router)#neighbor 192.168.1.2
R1(config-router)#neighbor 192.168.1.3(此命令执行后,OSPF会通过单播与邻居联系,如果联系得上并且条件符合,则建立邻居)
R1(config-router)#exit
R1(config-router)#exit
R2(config)#router ospf 1
R2(config-router)#nei 192.168.1.1
R2(config-router)#exit
R2(config-router)#nei 192.168.1.1
R2(config-router)#exit
R3(config)#router ospf 1
R3(config-router)#nei 192.168.1.1
R3(config-router)#exit
R3(config-router)#nei 192.168.1.1
R3(config-router)#exit
查看R1的邻居表:

在R2上ping测试:
R2#ping 172.16.4.1
Type escape sequence to abort.
Sending 5, 100-byte ICMP Echos to 172.16.4.1, timeout is 2 seconds:
.....
Success rate is 0 percent (0/5)
R2#ping 172.16.4.1 so 172.16.3.1(注意此处)
Sending 5, 100-byte ICMP Echos to 172.16.4.1, timeout is 2 seconds:
.....
Success rate is 0 percent (0/5)
R2#ping 172.16.4.1 so 172.16.3.1(注意此处)
Type escape sequence to abort.
Sending 5, 100-byte ICMP Echos to 172.16.4.1, timeout is 2 seconds:
Packet sent with a source address of 172.16.3.1
!!!!!(这里理论上有问题,详见下面粗体红字)
Success rate is 100 percent (5/5), round-trip min/avg/max = 32/65/100 ms
Sending 5, 100-byte ICMP Echos to 172.16.4.1, timeout is 2 seconds:
Packet sent with a source address of 172.16.3.1
!!!!!(这里理论上有问题,详见下面粗体红字)
Success rate is 100 percent (5/5), round-trip min/avg/max = 32/65/100 ms
除了手工指定邻居外,也可以修改OSPF的接口类型,这样路由器可以自动发现邻居并建立关系,这样可以减少手工配置的出错率。
配置过程:
R1(config)#router ospf 1
R1(config-router)#no nei 192.168.1.2
R1(config-router)#no nei 192.168.1.3
R1(config-router)#exit
R1(config)#int s0/0
R1(config-if)#ip ospf network broadcast(指定为广播类型)
R1(config-router)#no nei 192.168.1.3
R1(config-router)#exit
R1(config)#int s0/0
R1(config-if)#ip ospf network broadcast(指定为广播类型)
R1(config-if)#exit
R2(config)#router ospf 1
R2(config-router)#no nei 192.168.1.1
R2(config-router)#exit
R2(config)#int s0/0
R2(config-if)#ip ospf network broadcast
R2(config-if)#exit
R2(config-router)#no nei 192.168.1.1
R2(config-router)#exit
R2(config)#int s0/0
R2(config-if)#ip ospf network broadcast
R2(config-if)#exit
R3(config)#router ospf 1
R3(config-router)#no nei 192.168.1.1
R3(config-router)#exit
R3(config)#int s0/0
R3(config-if)#ip ospf network broadcast
R3(config-if)#exit
R3(config-router)#no nei 192.168.1.1
R3(config-router)#exit
R3(config)#int s0/0
R3(config-if)#ip ospf network broadcast
R3(config-if)#exit
查看相应的接口信息和路由器邻居:
R1#show ip ospf int s0/0
Serial0/0 is up, line protocol is up
Internet Address 192.168.1.1/24, Area 0
Process ID 1, Router ID 172.16.1.1, Network Type BROADCAST, Cost: 64
Transmit Delay is 1 sec, State DR, Priority 1
Designated Router (ID) 172.16.1.1, Interface address 192.168.1.1
Backup Designated router (ID) 172.16.4.1, Interface address 192.168.1.3
Timer intervals configured, Hello 10, Dead 40, Wait 40, Retransmit 5
oob-resync timeout 40
Hello due in 00:00:05
Supports Link-local Signaling (LLS)
Index 2/2, flood queue length 0
Next 0x0(0)/0x0(0)
Last flood scan length is 0, maximum is 1
Last flood scan time is 0 msec, maximum is 4 msec
Neighbor Count is 2, Adjacent neighbor count is 2
Adjacent with neighbor 172.16.3.1
Adjacent with neighbor 172.16.4.1 (Backup Designated Router)
Suppress hello for 0 neighbor(s)
这里实验结果的DR和BDR与书上说的理论完全相反,不知道是何原因,理论上172.16.4.1是DR,172.16.1.1是BDR,但是这里相反了,日后找到相关说明再来解释,如果没解释,就由它,不改了,实践是检验真理的惟一标准,不过这也有可能是模拟软件的问题,但是这个原因可能性很小。
理论上应该是这样:
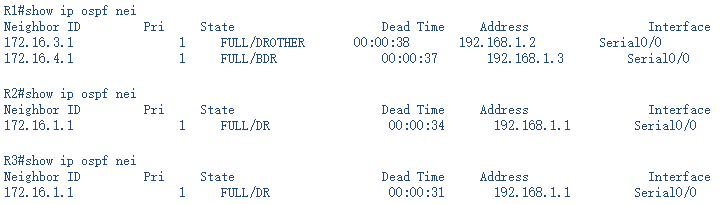
R1 的OSPF 邻居表,指出172.16.4.1为DR,172.16.3.1为DROTHER,而自己为BDR。
R2 的OSPF 邻居表,指出172.16.1.1为BDR,而自己为DR。
R3 的OSPF 邻居表,指出172.16.1.1为BDR,而自己为DR。
R2 的OSPF 邻居表,指出172.16.1.1为BDR,而自己为DR。
R3 的OSPF 邻居表,指出172.16.1.1为BDR,而自己为DR。
出现此问题的原因是因为Frame-Relay 的网络拓扑非全网状。R3 在与R1 在进行邻居创建时,R3 并不知道网络中还有R2 的存在。同时,R2 与R1 进行创建时,也不知晓R3 的存在。此时,在网络中运行的其实是两个不同的OSPF 的自治系统。
由于上述的问题,还会导致其它原因,比如:R3 路由器的172.16.4.0/24的子网出错,R3 会向R1 通告LSA,R1 在收到此LSA 后,R1 并不会向R3 转发,其原因是,R1 认为R3 是由DR 来完成通告的。其遵守OSPF 的多路访问网络的更新规则。另外:如果R1 的172.16.1.0/24 网络出错,R1 默认会向DR 通告,即向R3 通告,而不会向R2 通告,因为R1 作为BDR,只需要将LSA 通告给DR 即可,而其它的DROTHER 的通告是由DR 完成的,而做为DR 的R3 在收到R1 发送的LSA后,R3 实际上并没有向R2 通告,这是因为R3 并不知道网络中还有R2 的存在。
要解决这样的问题,必须手工的指定网络的DR 的角色。由于OSPF 的优先级会影响DR 的选举,优先级为0 的OSPF 的路由永远不能成为DR,优先级越高越容易成为DR 的原则,默认OSPF 的优先级为1,因此将R2 与R3 的优先级直接修改为0:
R2(config)#int s0/0
R2(config-if)#ip ospf priority 0
R2(config-if)#exit
R2(config-if)#ip ospf priority 0
R2(config-if)#exit
R3(config)#int s0/0
R3(config-if)#ip ospf priority 0
R3(config-if)#exit
R3(config-if)#ip ospf priority 0
R3(config-if)#exit
再查看各个邻居表:
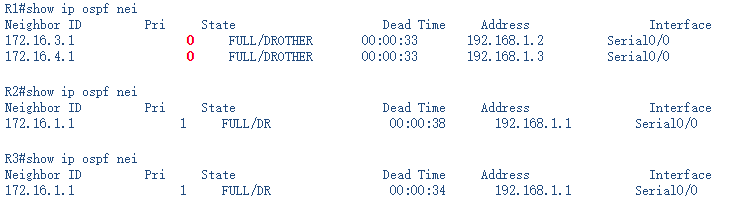
上述信息表明各路由器已经有了合适的角色,与上面的异常不一样,这次的优先级已经人为的修改为0,而不由RID决定DR。
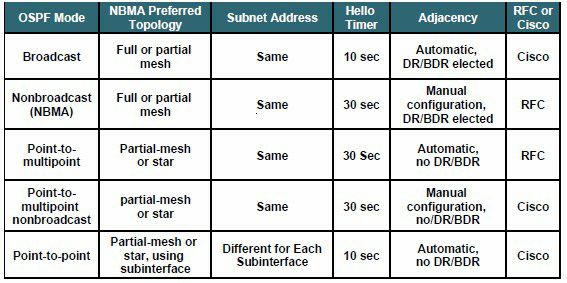
其实也可以修改OSPF 的接口类型,以避免DR 和BDR 的选举,从而减少DR选举出错的可能性。比如,将R1 的接口网络类型修改为P2MP(点到多点),而将R2 和R3 的接口网络类型修改为P2P(点对点)。因为在OSPF 的各种网络类型中:P2MP 和P2P 都是不需要选举DR 和BDR 的。
另外,在配置接口网络类型时,还注意接口的HELLO 死亡间隔时间。因为不同的类型的网络其时间是不一致的。不一致的HELLO 的时间间隔,会导致OSPF的邻居关系无法创建。
OSPF 所支持的网络类型和DR 选举,以及HELLO 时间间隔的表,以供参阅: